Does the device consume much battery when it is on external power?
Why do we not receive the alerts from our sub-accounts?
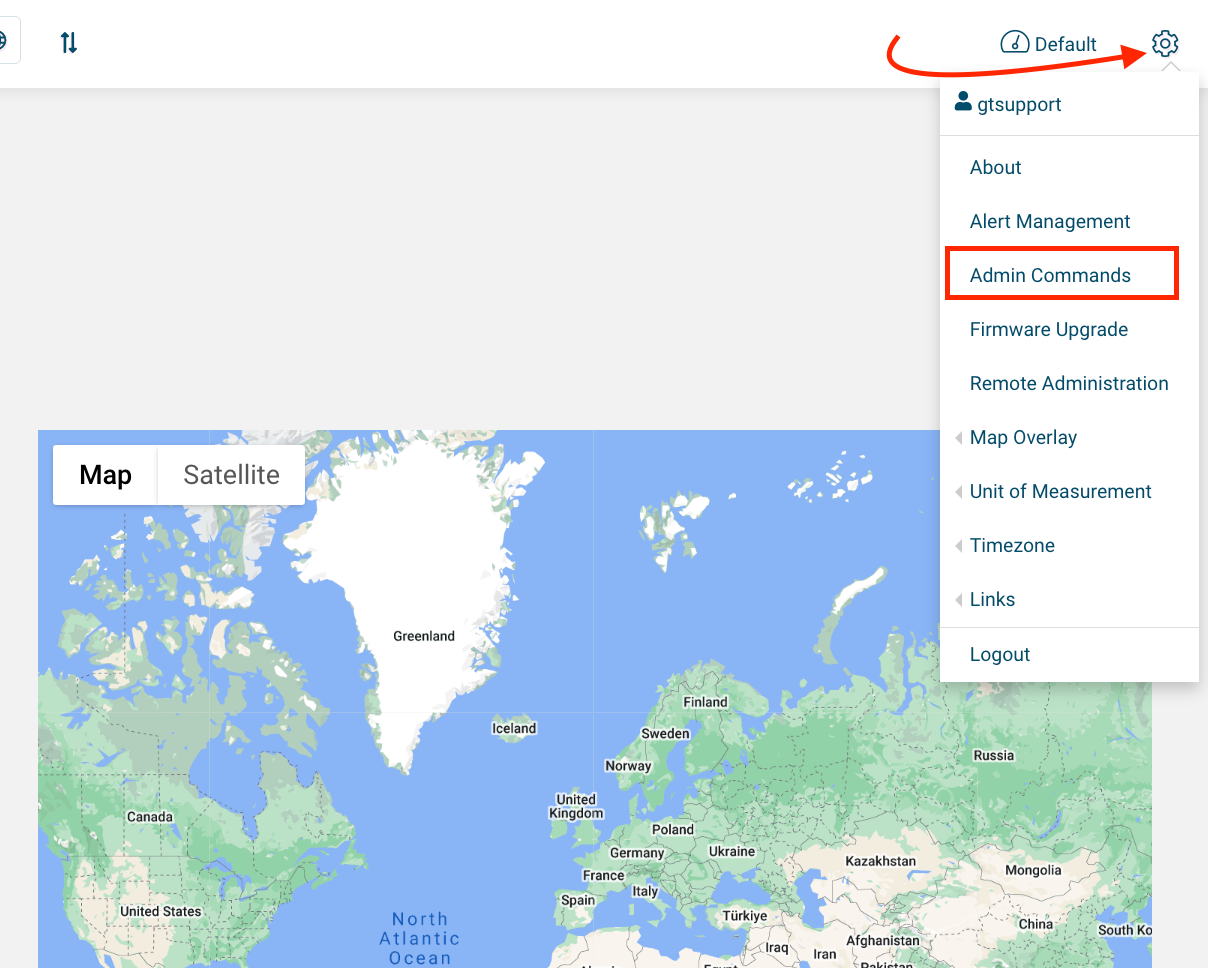
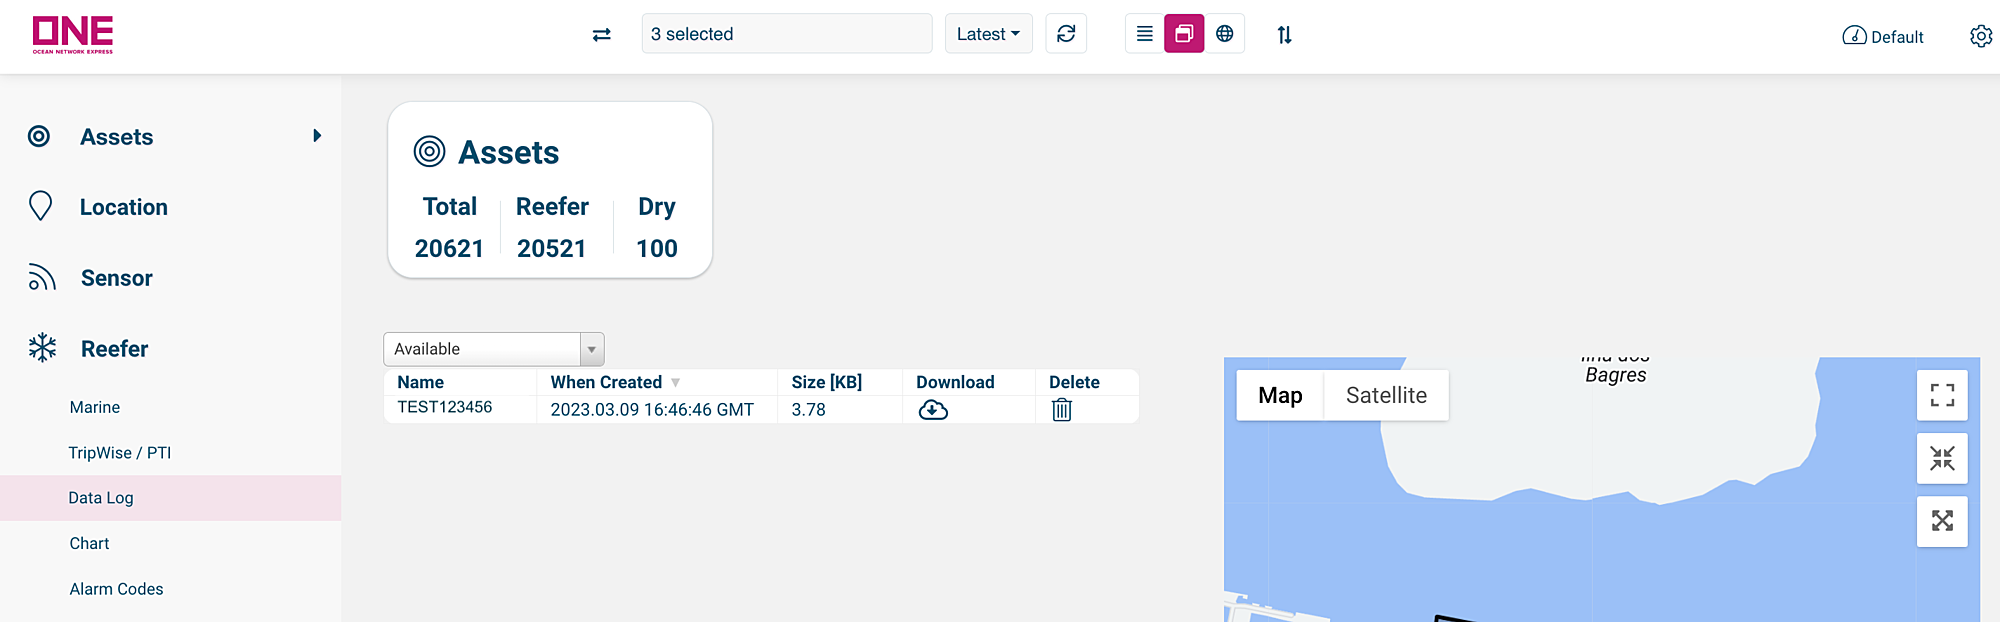
How to update the reporting frequency of a GTCM?
- Log into GT Sense GUI.
- From the Asset Name search box, select the Asset/s that needs to update the reporting frequency.
- Click on the cog on the upper right-hand side of the screen, and select Admin Commands.
- Fill out all the fields under Execution Schedule. External Power fields need to be a value between 15 minutes and 1440 minutes. ‘Cellular’ value cannot be lower than ‘Sensors’ value. Battery Power should be 4 hours or above.
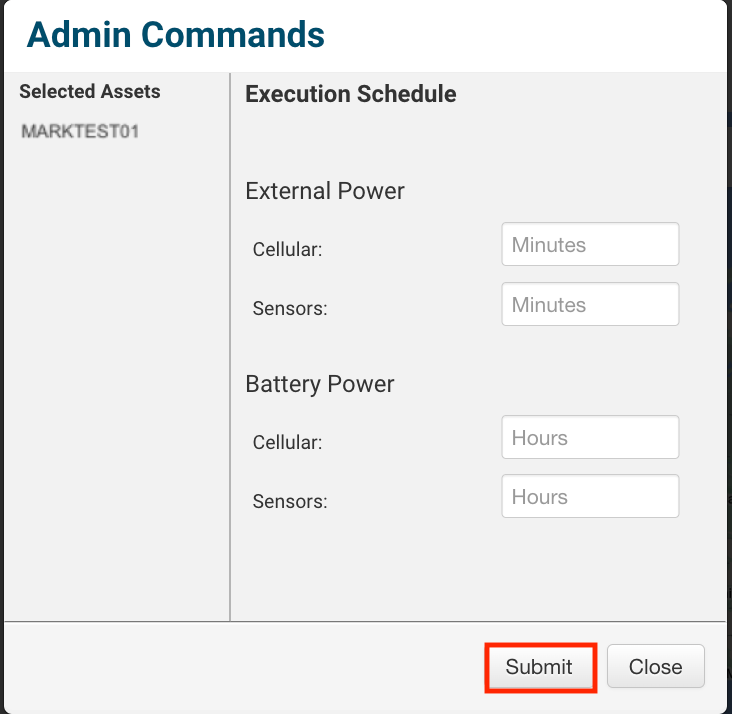
- Click Submit.
- Click Yes on the prompt.

- The status of the command will now be available under Commands > Command Data.Depending on (1) the signal, and (2) which power supply they are running at the time, the command will go through within 30 minutes (on external power, 15 minutes to take in the command + 15minutes when it calls again) or 8 hours (on battery).
Please note that the devices will not change their behavior until they call in and pick up the command. This means that not all of the devices will change their interrogation schedule and will happen over time. For example, devices on a vessel will not accept the command to change until in reach of a cell tower.
Why do we get unusually high temperatures?
Does the battery still work even if there is power interruption?
What is the status of the unit when there is power failure?
Unit OFF vs. Power OFF
What are Overview Cards?
How to hide the Overview Cards?

How to zoom-in on the Chart?
The Chart option in Reefers is showing 50 years.
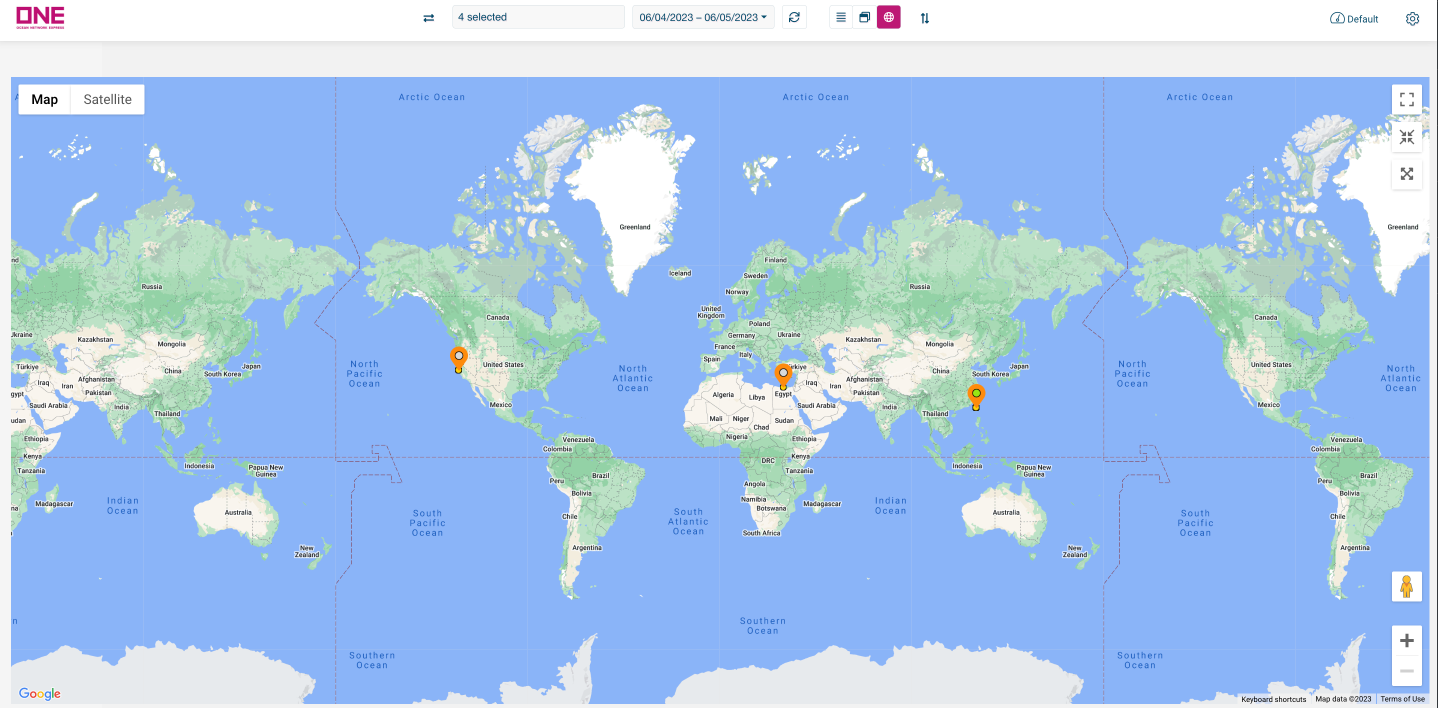
The X-axis time is like that when in Latest by default, showing only the latest single data points. You need to search historically (past day for example) for the map to zoom and pan in:

The chart only works for historical and doesn’t really tell you much for latest as this is a scatter chart.
When you select Latest, you get that point regardless of when it came in. For those units that have not communicated for a while, when you search historically you need to use that latest point as a reference, and use the Custom time range option if it’s older than one month.
How to hide the menu on the left side of the GUI?
Click on the first toggle button at the top preceding the Asset Selector drop-down menu.
Admin: How to Create a Sub-account?
Parent account is the principal owner of the sub-account.
This account would be able to monitor the assets that are under their sub-accounts, but the sub-account cannot see the other assets under their parent’s account.
If the user of the Parent account has Admin rights, they can create a Sub Account under their Company, and add users on his end. Soon after, they may move the asset IDs to the newly created sub-accounts.
1. Login to GT Sense GUI.
2. On the left, click on Admin > Customers.
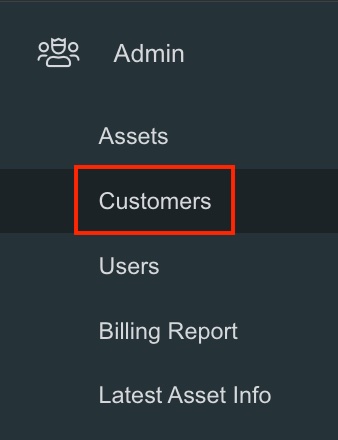
3. Click on Table Options drop-down arrow.
4. Click on Create Customer.
5. Enter the details:
SERIAL: ALL CAPS, Format: unique characters to distinguish the account, dot, 2-letter-country-code (e.g., TEST.DK)
NAME: Company Name
NOTE: Optional
6. Click Create Customer button.

7. Click Yes on the prompt that says “Are you sure you want to create new customer?”
To disable the account, go back to Admin > Customers > click on the account, and click Disable.
Admin: How to Move Asset to a Sub Account?
Admin: How to Create and Modify User Account?
Why am I seeing lines instead of yellow dots?
In some cases, you will be seeing a line between two location points instead of small yellow dots.

When you see a line instead of a point, that means for some reason, no location (GPS position) was recorded during those times.
This can be caused by either:
1. Antenna issues.
Ask the technician to make sure that the antenna is connected properly, is in good condition, and has no corrosion. Replace if necessary.
2. Not enough satellites from where it’s at.
With GPS, it needs to synchronise with three satellites to determine its position. So it is possible to have good cell service and still not have good satellite access, especially if the asset is inside the building.
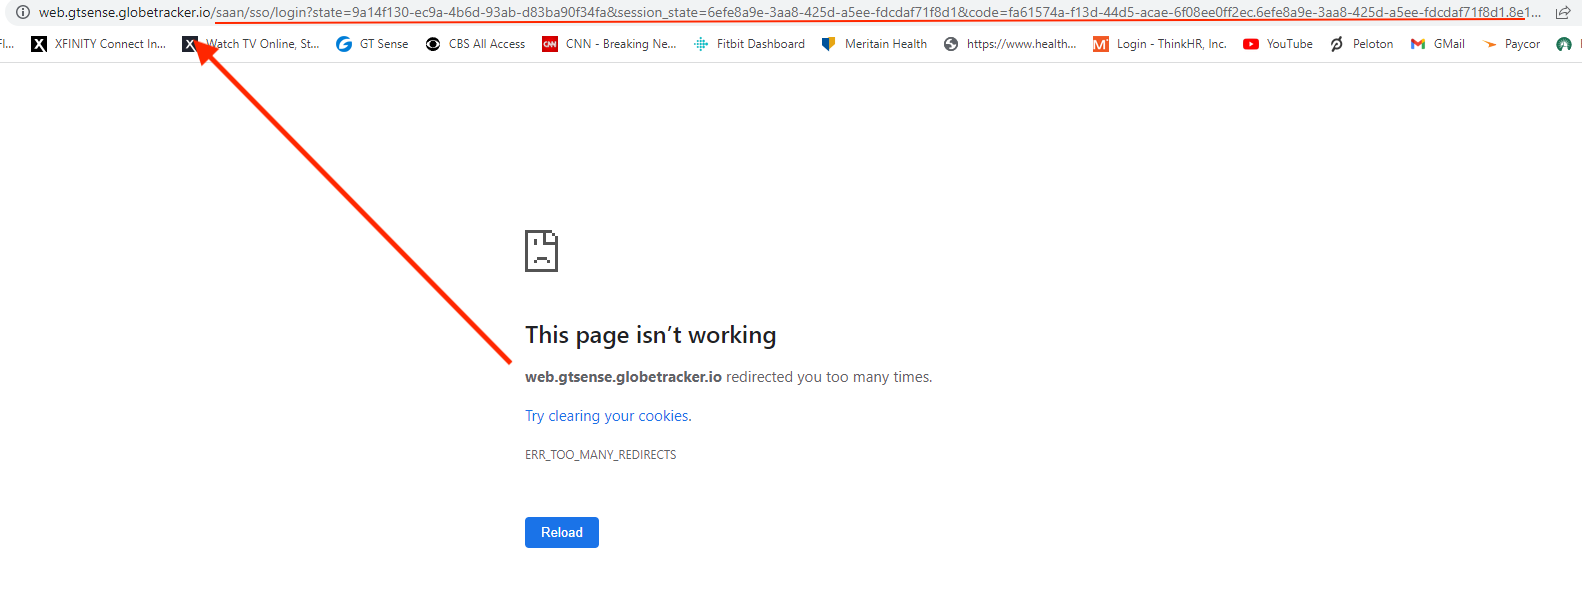
Error: Too Many Redirects/Clear Cookies
Users may contact us about the error ‘ERR_TOO_MANY_REDIRECTS’
This is typically caused by the URL they are using to access the GUI.
The URL to be used should only contain http://one-line.gtsense.globetracker.io/
Why am I not seeing any assets?
Alert Management: How to setup G-Force Alert?
G-Force or Shock alerts can be setup on our GUI. This article will show you how to create this alert.
- Select the asset ID(s) that you want to setup the alert on.
- Go to Alert Management on the upper right-hand side after clicking on the cog (settings) icon.
- Select Max. Shock from the Alert Rule Type drop-down list.
- For multiple assets, go to All Selected tab, and enter the user’s preferred max. shock (g).
 If the Max. Shock field does not appear, you may have selected more than the allowed number of assets that it can handle. You may select the assets in parts by filtering their prefixes (or just a letter will do), and try setting them up again.
 - Select Create.
- To see if the alert has been setup, go to Alerts > Active Rules > Select Max. Shock under GTCM Sensors.

How to Set-up Polygons for Geofences?
A geofence is a virtual perimeter for a real-world geographic area. A geofence could be dynamically generated (as in a radius around a point location) or match a predefined set of boundaries (such as school zones or neighborhood boundaries). [Reference: Wikipedia]
Geofencing is a way to define a geographical zone to track if your vehicles are leaving or entering that zone. With geofencing, the system uses the GPS signals from the tracking device to pinpoint location and marks the limits of an area. This area is the geo-fence. [Reference: Quartix]
On GT Sense GUI, you may create a geofence from the Zones tab on the left side of the page. To know more about how to create a Zone, go to this help guide.
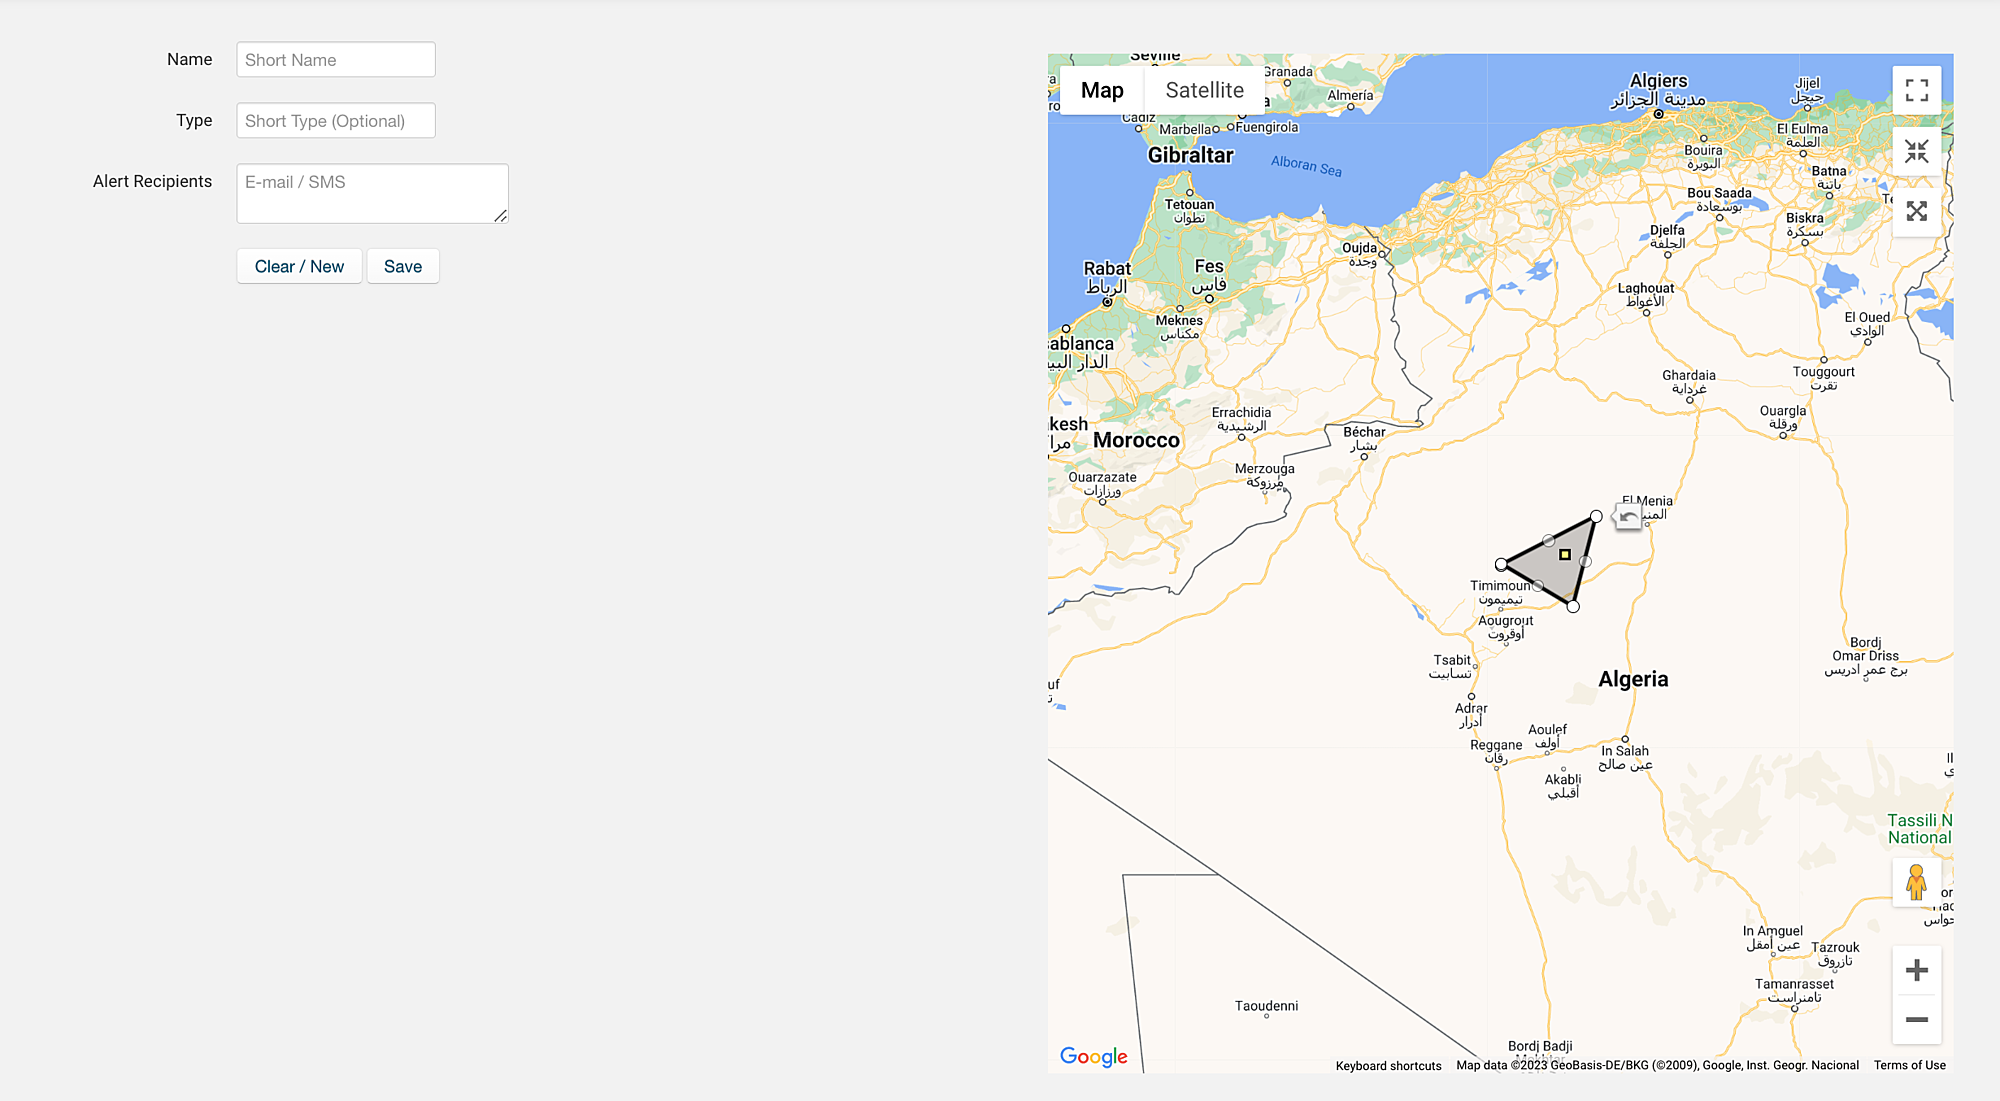
However, clients may send us polygon points, and ask us to create zones from those polygons. The GUI has no feature to allow us to upload these polygon points, but the workaround is to put these polygon points into Google Maps. and copy the created polygon into the GUI.
NACK replies everytime the unit calls in
How to Generate A Health Report of the Entire Fleet?
Only those with Admin rights can generate a Health Report from the Admin section.
- From the GUI, Go to Admin > Latest Asset Info.
- Click on Table Options to expand the page.
- Click on the Health Report button
- Click Yes on the prompt
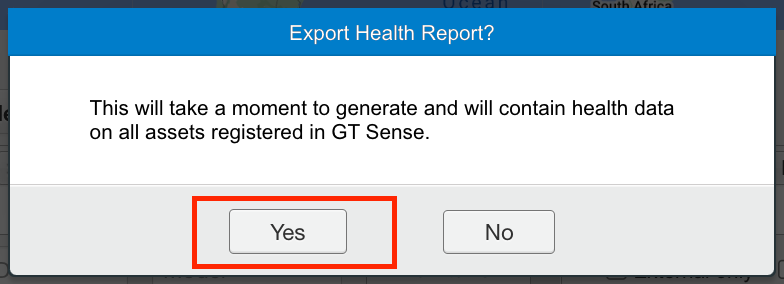
This should generate the Health Report of all the assets in the entire fleet.
How to subscribe/unsubscribe from alert notifications?
To set up the email or SMS alerts,
- Go to the GT Sense GUI.
- Click Options (gear icon) > Alert Management on the upper right-hand side of the screen.
- Go to Alert Recipients tab, and fill out the fields.
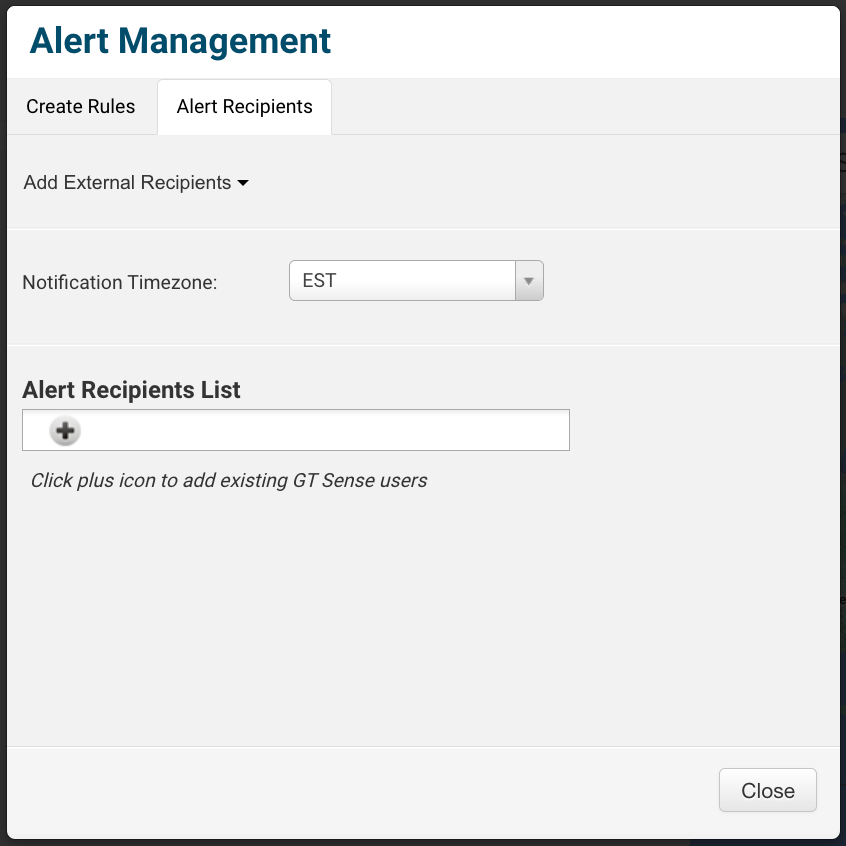
- Click Close. The recipients should be able to receive alerts generated by the units on the entire fleet.
The recipients, however, cannot select which specific alerts they would like to receive. If they are in the alert recipient list, they get notified about ALL alerts if they are set — EXCEPT for the one under “Zone” for the “IN/OUT” alert notifications as that one is stand-alone with its own alert recipient list.

They may set up/filter the incoming alerts from their own email client.
- To unsubscribe, follow the same steps from 1-3, but remove the email address or the phone number that does not want to receive alert emails/SMS.
How to send a datalog command?
For end users with Admin rights or those who have write-access to Datalog Download,
- Log into GT Sense GUI
- Enter the Asset ID in the Search field at the top.
- Check the box preceding the Asset ID.
- On the left side, click on Reefer > Marine.
- Click on the Wrench icon after the Asset ID.
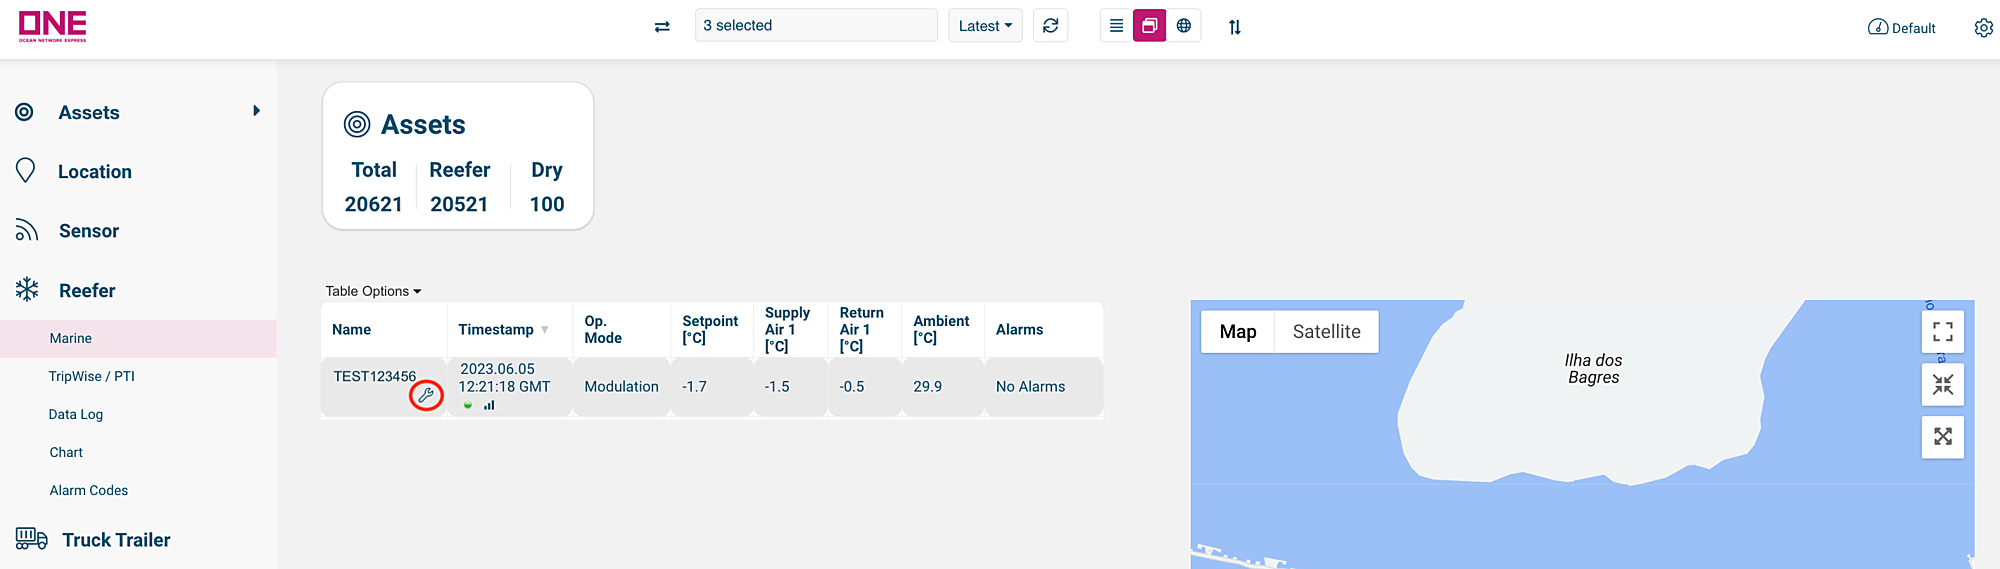
- Click on the Datalog button on the left hand side of the screen, and select the range of the datalog that you want to download.Depending on the manufacturer, the buttons on the left hand side may vary.
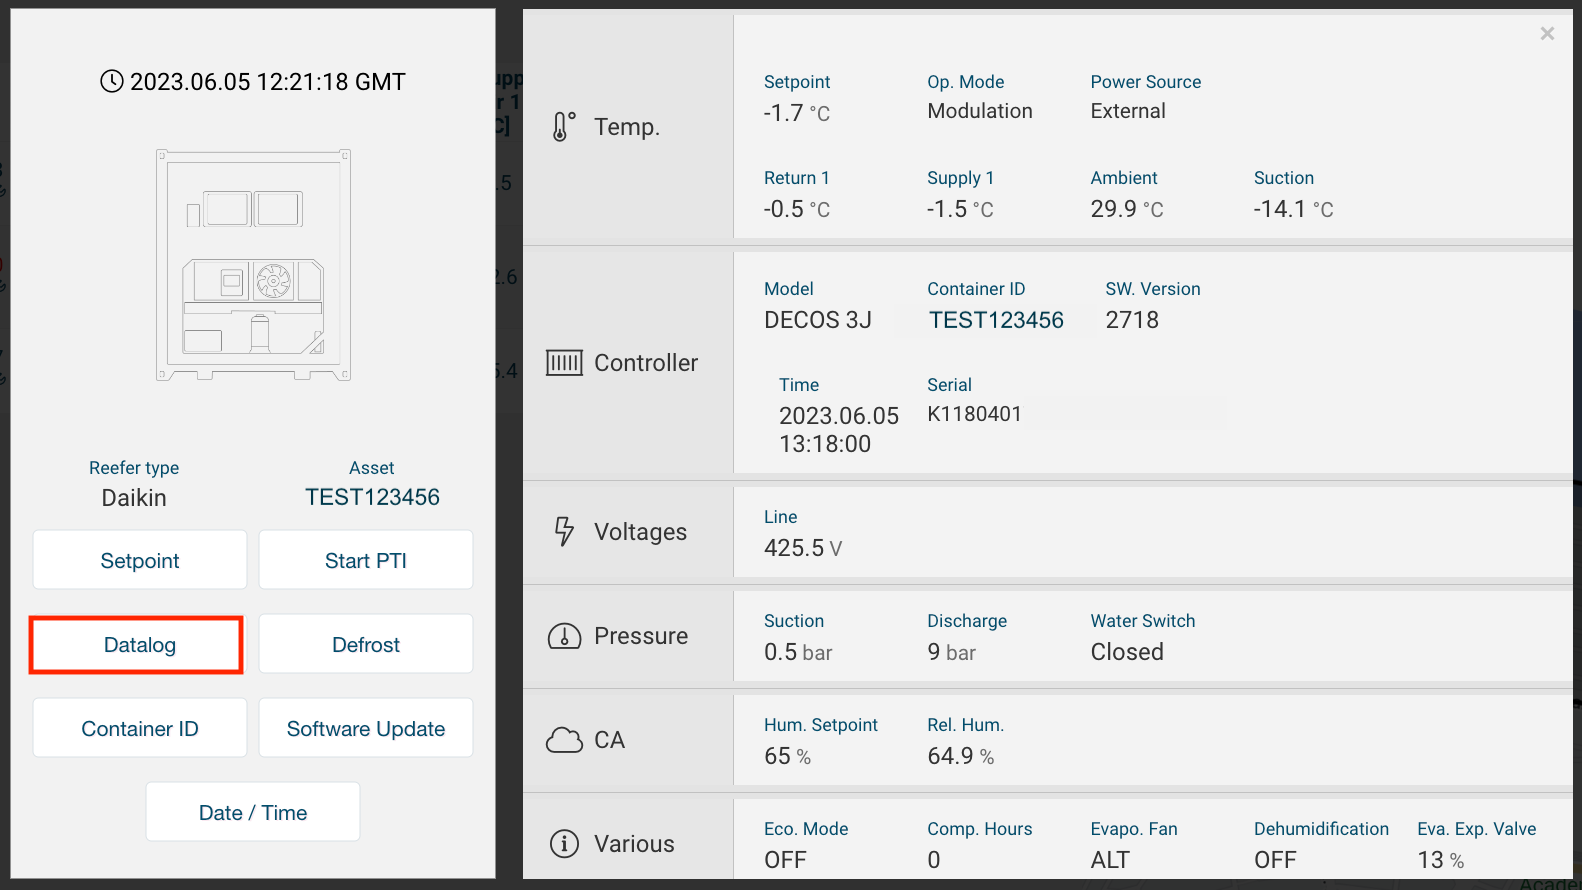
- Click Submit.
If the unit does not have cellular service at the time that the datalog command is sent, the command will be on pending status. The unit will pick up the command the next time it has a cell signal, and will then attempt to send us the data log once it pulls it from the controller.
When the device reports on battery power, there is zero voltage applied to the asset controller. So our device doesn’t get any data from the controller because the controller doesn’t work at that time. So there won’t become any datalog available to the server to download.
- To view the status of the command, go to Commands > Command Data, and select the command status from the drop-down list.
- Once the datalog file is ready to download, you will find it on Reefer > Data Log. Click on the Download icon opposite the Asset ID.
Smart PTI logic
How to setup Geofence/Zone Alerts?
For alerts when an asset enters a specific zone :
If the end-user wants to receive notifications when an asset enters a specific zone, follow the next steps:
1. Log into GT Sense.
2. Click on the Zones tab.
3. Click on List.
4. Locate, and click on the zone name.
5. Add the recipient’s email address in the Alert Recipients field.
6. Click on Update once the email address is added to that zone.
For alerts when a specific asset enters a zone:
If the end user wants to receive notifications for a specific asset entering a zone, follow the next steps:
1. Enter the asset numbers in the GT Sense GUI.
2. Click on the Settings cog on the upper-right hand side of the screen.
3. Click on Alert Management.
4. Click on the dropdown arrow under Alert Rule Type and set it to Zone Tracking.
On the left hand side, you will see all the assets you have selected.
On the right hand side, under the All Selected tab, click on the dropdown arrow for each asset and make sure the Zone enter/Exit Alert is ON.
5. Click on Create. This will notify the recipient every time that specific asset enters a new zone.

To double check if the changes you just made have taken place
1. Close Alert Management.
2. Click on the Alerts tab.
3. Click on the Active Rules tab.
4. Click on the drop down arrow to select Zone Tracking.
You should see all the assets you just turned on the Zone Tracking feature.
If a user does NOT want any reefer notifications, and ONLY wants GEO zones notifications make sure the user’s email is not included in the Alert Management tab.
How to disable the Asset ID?
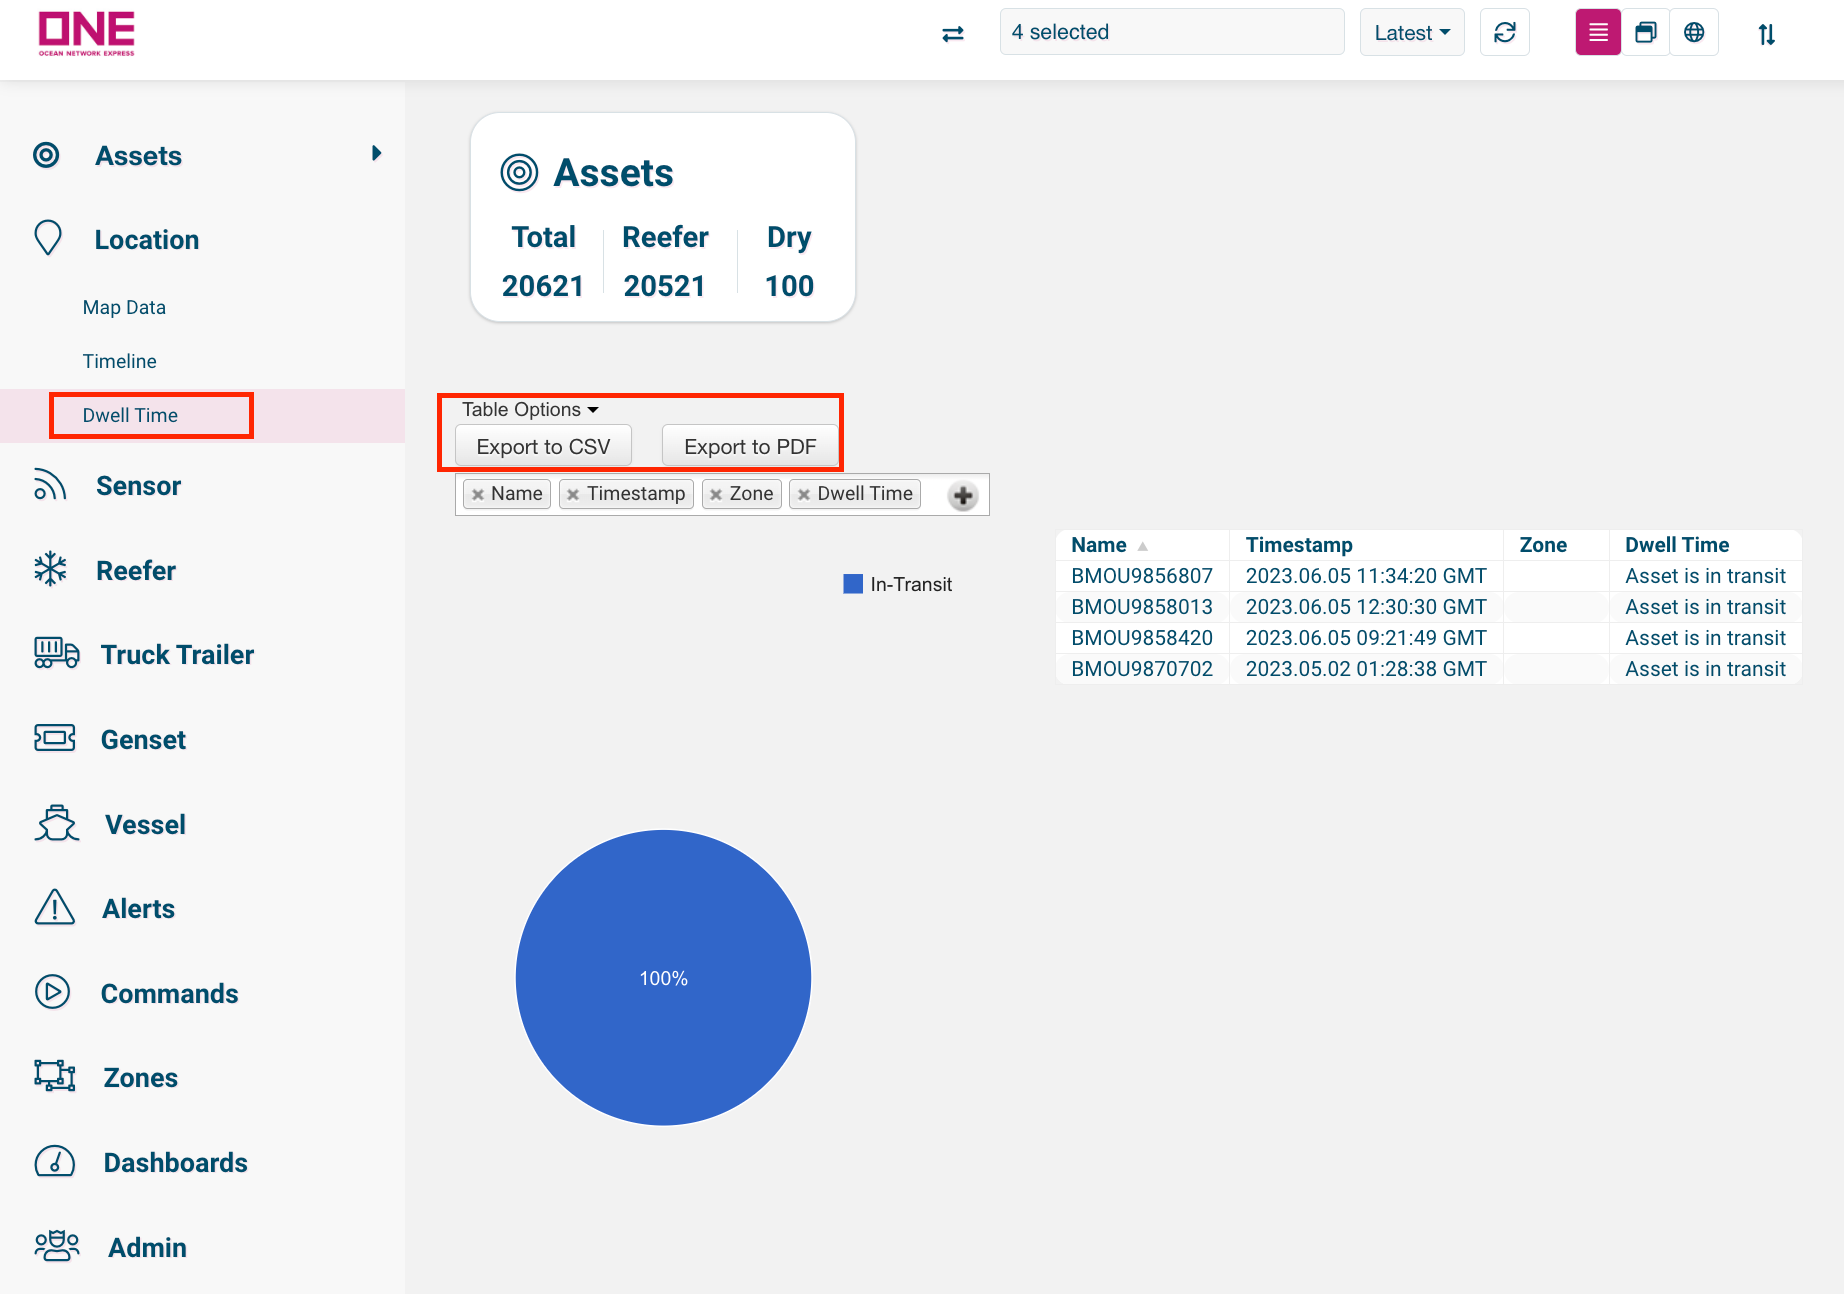
How to export Dwell Time data?
- From the GT Sense Platform, enter the Asset ID in the Search field at the top of the GUI.
- Check the box preceding the Asset ID.
- Click on Location > Dwell Time.
- Click on the Table Options drop-down list to get the option to export into csv or pdf file.
Creating a Dashboard on GT Sense Platform
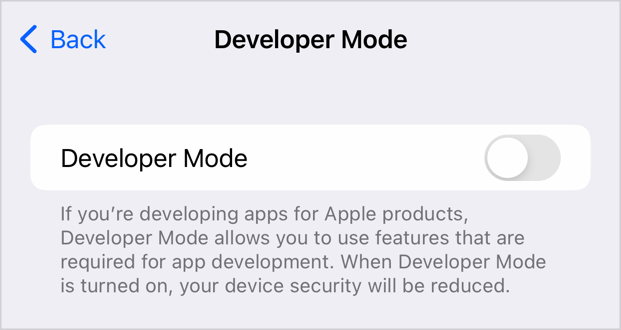
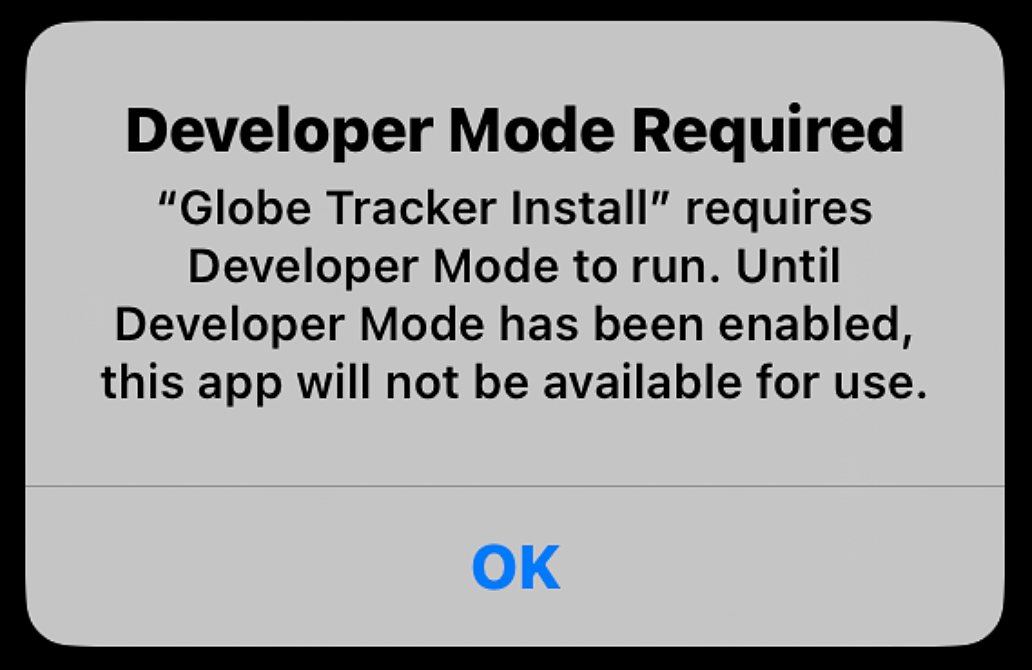
Developer Mode Required Error
The new 16.0 iOS upgrade requires the user to enable ‘Developer mode’ to access apps that have not been downloaded directly from the App Store. Because GT Install and GT Pair are installed through iTunes, they will need to bypass this requirement.
Here’s how to enable Developer Mode:
1. Go to Settings > Privacy & Security on the iOS device.
2. Scroll down to the Developer Mode list item and navigate into it.
3. To toggle Developer mode, use the Developer Mode switch.